A unique registration code will be automatically generated after you’ve connected your player device to the internet. If you’re still not seeing it, simply reboot your player by unplugging it from power for a few seconds.
Please read carefully to ensure your startup goes as smooth as possible. Need more help? Please contact us.
NOT RELEVANT FOR MOST CUSTOMERS
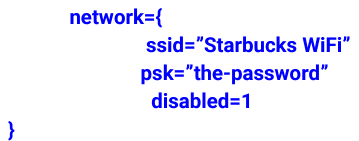
What is an SSID? SSID (Service Set Identifier) is simply the name of your WiFi network, which is typically visible in a list of nearby networks. Sometimes a company will choose to hide the SSID so that it isn’t broadcast for people to connect to. In this case you must know what the SSID (and password) are in order to connect to it invisibly. For Raspberry Pi players, follow the steps below:
NOTE: If you had previously connected your Pi to another WiFi network, then it is still available and should be removed from memory so the Pi won’t connect to it instead of the new hidden network.

7. Press CTRL+X followed by ‘Y’ and enter to save the file.
8. Type “sudo reboot” to reboot your Pi.
1. DHCP Configuration
Raspberry Pi OS (formerly known as Raspbian) uses DHCP (Dynamic Host Configuration Protocol) to assign an IP address to the Raspberry Pi automatically whenever it is rebooted. You can find out more in this guide to DHCP.
To change Raspberry Pi OS’s behavior so that it uses the same static IP address each time, you will need to modify the configuration file for the DHCP client daemon, dhcpcd.conf.
Before that, you will need some information on your current network setup so you can add the required details to the configuration file. You will require the following info:
To find the Raspberry Pi’s current IP address, do the following:

To find it, type “ip r | grep default” and press enter.

Note the first IP address given:

Your router’s DNS (Domain Name System) IP address. This is typically the same as its gateway address, but may be set to another value to use an alternative DNS – such as 8.8.8.8 for Google, or 1.1.1.1 for Cloudflare.
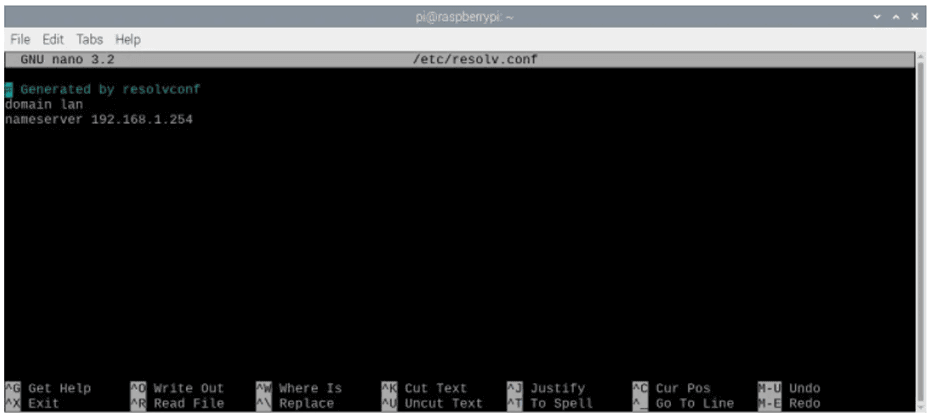
To find the current DNS IP address, type “sudo nano /etc/resolv.conf”

Note the IP address after nameserver – that’s the DNS address – and then press Ctrl + X to close the file.

2. Add static IP settings
Now you have found all your network connection information, it’s time to edit the dhcpcd.conf configuration file to add the settings you need to set up a static IP address for your Raspberry Pi
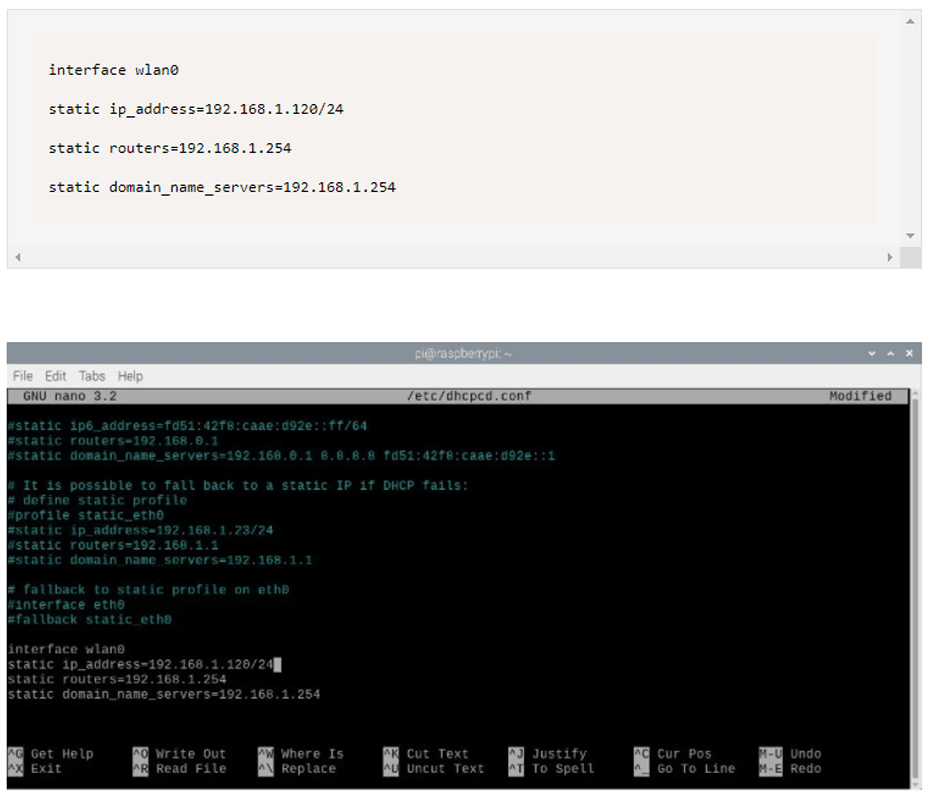
Type “sudo nano /etc/dhcpcd.conf” and hit enter.

If you haven’t edited the file previously, it will mainly contain various comment lines preceded by a hash (#) symbol. At the bottom, add the following lines, replacing the emboldened names with your own network details as noted below. You may instead delete all lines in the file and just this information:

Replace the emboldened names as follows:
NETWORK – your network connection type: eth0 (Ethernet) or wlan0 (wireless).
STATIC_IP – the static IP address you want to set for the Raspberry Pi.
ROUTER_IP – the gateway IP address for your router on the local network.
DNS_IP – the DNS IP address (typically the same as your router’s gateway address).
Here is an example configuration to set the static IP to 192.168.1.120 with a wireless connection to a router at 192.168.1.254:

Once you have entered the settings, press Ctrl + X and then Y and ENTER to close and save the modified configuration file.
3. Reboot the Raspberry Pi
With the dhcpcd.conf configuration file modified, restart your Raspberry Pi to effect the changes and set the static IP address for it.
Type “sudo reboot” to reboot the device.

Rather than using an address assigned automatically by DHCP, the Raspberry Pi will now attempt to connect to the router using the new static IP address that you set in the dhcpcd.conf file. To check that it is working correctly, type “hostname -I” and hit enter.

You should now see the static IP address that you set in the dhcpcd.conf configuration file.

Congratulations: you have set up a static IP address on your Raspberry Pi!
There is no reset procedure per se for the Raspberry Pi 4B (Lite Player). If you are experiencing erratic behavior, it is most commonly due to the following reasons:
If none of the above solve your problem then the operating system stored on the SD card may be corrupt. The solution is to write a fresh copy of the OS to the SD card. For that, you can follow the steps in our knowledgebase help article. The Lite model that we sell uses a high performance Flirc case, so you can use the overclocked image file we reference for best performance.
How do I get a registration code?
A unique registration code will be automatically generated after you’ve connected your player device to the internet. If you’re still not seeing it, simply reboot your player by unplugging it from power for a few seconds.
Where do I enter the registration code?
Login to your SmartSign2Go account from your office computer, phone or tablet. Next, click on the little play icon on your chosen channel and choose “on new playback device.” Enter the code you see on your TV screen and click “Register!” You can also register your player by visiting the players section of settings.
Why is the image shrunk on the TV screen?
Sometimes the player and your TV aren’t able to handshake when they need to. The fix is to simply reboot your player by unplugging it from power for a few seconds.
Why don’t I see a picture on the TV?
Be sure to connect your player to power with the included power supply and double check that your TV is set to the HDMI input that you’ve connected the player to (e.g. HDMI 1). When in doubt, simply reboot your player by unplugging it from power for a few seconds.
Why won’t the keyboard and mouse work?
Be sure to connect your keyboard and mouse to any of the USB ports on the player device and NOT the TV itself. If you are using the wireless keyboard/mouse that came with your player, be sure that you are using it wirelessly. The cable that comes with it is only for charging the battery. Inside you’ll find the USB wireless receiver. Remove that and insert it into a USB port on the player. Lastly, be sure to turn the keyboard on with the power switch at the top-right!